Trimester 2: P-51D Mustang with an integrated A.R.E.S. (Autonomous Rc Electric System)
For this project I intend to buy an RC airplane and integrate a holistic control system using an arduino.
We will call this control system an ARES.
The ARES can serve the following purpose:
We will call this control system an ARES.
The ARES can serve the following purpose:
- Surveillance, you can mount a camera to the nose or the under carriage.
- Demonstrations, showing proper maneuvering, educational purposes or after more work (maybe if your receiver loses the connection to your transmitter it could return using some other sensors)
For this project I plan to do the following:
Phase 1: Initial / Pre-Flight
Phase 1 Parts 1-2: Make sure to buy products with your plan in mind, for example if you plan to add more control surfaces make sure to buy a plane with enough space. For all purchases make sure to research stores and forums in order to find the best product and the best deals.
Phase 1 Part 3: Assemble the plane and start flying in order to better understand how it works.
Phase 1 Part 4: Wire the servos to the arduino include a bread board to for the initial wiring and after Phase 2 Part 1 (see below), you can transfer everything to a ported pc board because it can be lighter and, in some cases, smaller than a breadboard; it is also more secure. After you've wired everything correctly, make a program to control the servos: you can call this a "Pre-Flight Test"
Phase 2: Flight
Phase 2 Part 1: Add the motor to the circuit on the breadboard and to the program. Following the successful completion of this task, you have the option of replacing your breadboard set up with a ported pc board.
Phase 2 Part 2: Make a flight plan and program the servos & motor to fly according to this plan; it might be necessary to purchase a gyroscopic motion chip of some sort to help make minor corrections and to keep the plane level. The flight plan is where your practice earlier will come in handy; while you practice you should make note of your surroundings and try to fly your flight plan a few times by hand.
The Links to Inspiration:
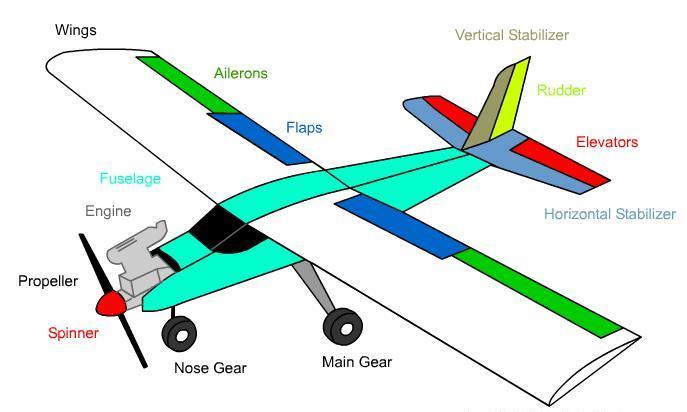
- Summary of the Airplane
- How Flight Works
- Flight Control System
- History of the P-51D
Phase 1: Initial / Pre-Flight
- Purchase RC Plane (make sure to have at least 2 receiver-transmitter sets). I upgraded the servos and motors on my plane to compensate for the added weight, this may or not be required for your aircraft, but servos and motors are very easy to install and they will occasionally be easy to install.
- Purchase the second Receiver-Transmitter Set.
- Set up & test the plane as it's supposed to be.
- Integrate Arduino.
Phase 1 Parts 1-2: Make sure to buy products with your plan in mind, for example if you plan to add more control surfaces make sure to buy a plane with enough space. For all purchases make sure to research stores and forums in order to find the best product and the best deals.
Phase 1 Part 3: Assemble the plane and start flying in order to better understand how it works.
Phase 1 Part 4: Wire the servos to the arduino include a bread board to for the initial wiring and after Phase 2 Part 1 (see below), you can transfer everything to a ported pc board because it can be lighter and, in some cases, smaller than a breadboard; it is also more secure. After you've wired everything correctly, make a program to control the servos: you can call this a "Pre-Flight Test"
Phase 2: Flight
- Include the motor in the system.
- Make the airplane fly using the Arduino
- (Optional: integrate more functions into the airplane), for example:
- 3d printing a replacement for the canopy, making the plane lighter and more aerodynamic.
- 3d printing a case for the Ares to protect it in case of a crash
Phase 2 Part 1: Add the motor to the circuit on the breadboard and to the program. Following the successful completion of this task, you have the option of replacing your breadboard set up with a ported pc board.
Phase 2 Part 2: Make a flight plan and program the servos & motor to fly according to this plan; it might be necessary to purchase a gyroscopic motion chip of some sort to help make minor corrections and to keep the plane level. The flight plan is where your practice earlier will come in handy; while you practice you should make note of your surroundings and try to fly your flight plan a few times by hand.
- Goal 1: Autonomously take off, fly along a straight path and land
- Goal 2: Add one or two maneuvers to the path, making it no longer straight
The Links to Inspiration:
- Concept
- Concept part 2 (helps with understanding how to program the throttle) *in this case the arduino would serve as a programming card
- also see the Instructables website although I found helpful forum posts on: diydrones.com, arduino.cc and rcgroups.com. (links to these sites will be posted in their respective section)
- Summary of the Airplane
- How Flight Works
- Flight Control System
- History of the P-51D
Step 1: Purchase RC Air Plane
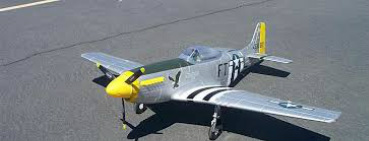
1. RC Plane: For the aircraft I've chosen to purchase a Dynam P-51D Mustang (an RC small scale P-51D)
- I chose an RTF version (Ready To Fly) so I only had to purchase one extra receiver and transmitter set and so that the servos would be ready for me to connect to the arduino.
- I chose this particular plane design because of it's functionality and price range in addition to the small number of motors (one) and a fair number of servos; it could work with many other designs; in fact planes of another type or price range might be better suited for a project like this.
- This particular plane is also of a more portable size than many of the other rc planes on the market
- Also I chose, Dynam because they have a great reputation, although any other brand should work the same way
- Let's call the configuration I'm building "A.R.E.S." (Autonomous Rc Electric System)
Step 2: Purchase a Second Transmitter and Receiver Set

2. RC Transmitter & Receiver: I bought this set from a person on ebay
- I chose to buy it from him rather than an official seller because it was significantly cheaper.
- I chose this particular set because it is exactly the same as the set included with my aircraft, so it will have the same functions, capabilities and specifications.
Step 3: Set Up
|
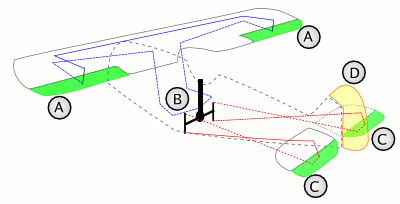
Control services on an actual plane
|
Assembling The Plane:3. Putting it Together:
|
Final Purchases:4. Whatever plane you have make you sure you have:
|
Test Operations:5. Make sure everything works:
|
Aircraft Construction Level 1: Stock P-51D
|
P-51D Build notes:
|
|
Step 4: Arduino Integration
Wiring6.Connect the Servos to the Arduino by:
|
Programming stage 1: Pre-Flight (servos only)7. Determine how to manipulate the servos and the motor:
|
Testing: Pre-Flight Phase Finale8. Test to make sure your code works with the servos:
|
Here Ends Phase 1 of the project
Phase 2 Preparation:
Adding a Gyro Processor: (Optional)
- This will allow the plane to remain stable by
Phase 2
WARNING:
Do a pre-flight test of all servos and motors before take off, this way you do not have to go through the trouble of repairing your plane after it crashes from a simple mistake.
Replacing wings is simple and self-explanatory. Just pay attention to what you take apart.
Replacing wings is simple and self-explanatory. Just pay attention to what you take apart.
Step 1: Including the Motor in the Program
Coming Soon!
Step 2: Fully Autonomous Flight
ARES enabled flight will be "dumb," meaning there is no data being received and nothing to process data to make the aircraft avoid obstacles or adjust it's flight path. There are only the commands given in the program.
Project Code
Example Code: Basic example of how to control a servo.
| servo_source.ino |
Pre-Flight: Servo only code
| pre_flight_test.ino |
